Showing posts with label SNACKS. Show all posts
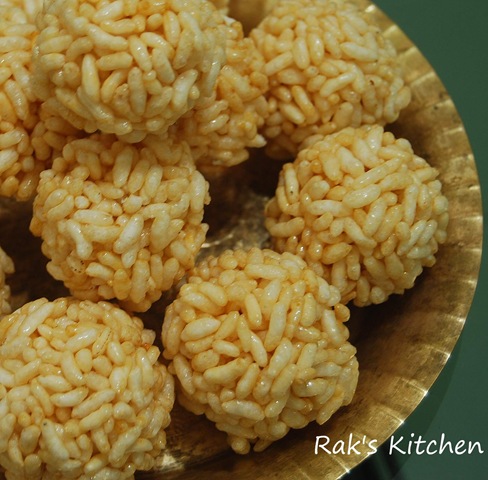
PORI URUNDAI FOR KARTHIKAI DEEPAM
in SNACKS on Tuesday, December 11, 2012
Balls made with jaggery and puffed rice.
Wishing you all happy karthigai deepam!! As a kid,I always enjoyed this festival and had fun in litting lamps and decorating.Me and my brother,will save some crackers on deepavali and burst it on this day!

My mom used to do two varieties of pori(paddy puffed rice and ordinary puffed rice),one she will just make it as a brittle and one into balls. And here in Singapore since I couldn't find the varieties,I just made balls using our ordinary puffed rice.
Ingredients:
| Puffed rice | 4 & 1/2 Cups(approx) |
| Jaggery | 1/2 cup |
| Cardamom | 1 no. |
| Water | as needed |
| Ghee | to grease ur hands |
Method:
- Powder the jaggery and heat it with water just to immerse it in a broad vessel.
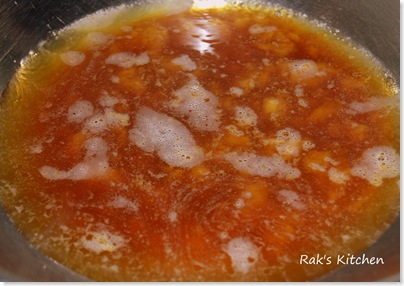
- After it completely dissolves,filter it in a cloth or metal strainer to remove impurities.
- Add cardamom powder to it and heat the syrup till it reaches a consistency of rolling ball( I.e;Keep water in a bowl and test the syrup by pouring a few drops in water,it should not dissolve immediately and you should be able to form a loose ball,but hold its shape)
- This is how you can test,I dint roll and show below as I was keen in not missing the consistency;D
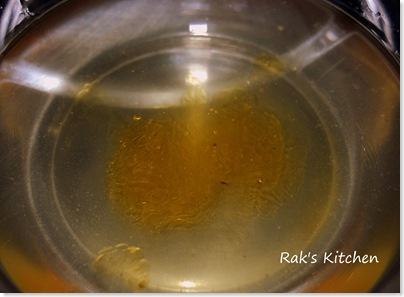
- Do keep the fire in low, when the consistency is about to reach.
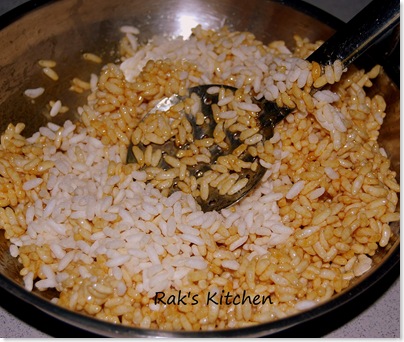
- When you reach the specified consistency,remove immediately and add the puffed rice slowly and mix it.Till you don't find any syrup in the bottom of the vessel.And the mixture should not stick in your hands.If its too sticky,then you add more puffed rice to it and mix again.
- Grease both your hands with ghee, and roll tightly into balls of your desired size.
- For half cup of jaggery I could make 14 balls, and the measurement of puffed rice is approximate and please add accordingly.
- You can add roasted sesame seeds,fried gram dal(pottukadalai) too.
- At the end,while U are making balls, it will harden...so keep again in stove for a fraction of minute to make it loose and roll again...
- Store in an air tight container and enjoy!


Note:
Be sure that your syrup reaches rolling ball consistency,or else you cant make balls!!!
CHILLI PANEER (DRY)
in ACCOMPANIMENTS, KIDS CORNER, PANEER DISHES, SIDE DISH FOR CHAPATI, SNACKS on Thursday, November 29, 2012

Few weeks back I realized I make only few repeated paneer dishes at home which we all got bored of


Ingredients:
| Paneer(cubed) | 200 gms / 1 & 1/2 cup |
| Capsicum | 1 no. |
| Onion | 1 no. |
| Green chilli | 4-5 nos. |
| Soy sauce | 1-2 tsp |
| Chilli sauce/tomato sauce | 1 tblsp |
| Lemon juice | 1 –2 tsp |
| Pepper powder(black) | 1/2 tsp |
| Garlic flakes | 5-6 nos. |
| Ajinomoto (optional) | 1/4 tsp |
| Chopped coriander | 4-5 tblsp |
| Salt | as needed(1/4-1/2 tsp) |
Batter for frying Paneer cubes:
| Maida/all purpose flour | 1 & 1/2 tblsp |
| Corn flour | 1 & 1/2 tblsp |
| Cooking soda | a small pinch |
| Salt | As needed (1/2 tsp) |
Oil for deep frying and frying

Method
- Make a thick batter of maida and corn flour with salt,the batter consistency should be enough to coat the paneer smoothly.
- Deep fry the paneer cubes by dipping them in this batter ,drain in paper towel.
- Cube the onion,capsicum,slit the green chillies and crush the garlic flakes roughly.
- Heat a wide pan with 2 tsp oil and add the crushed garlic,green chillies,give a fry.Add the onion and fry till transparent.
- And then add the capsicum. Give a stir in high flame.
- Reduce flame and add the sauces,pepper salt and mix well.
- Add the deep fried paneer cubes and mix in the lemon juice and mix well until everything blends evenly.
- Lastly add the coriander leaves and transfer to the serving dish.
- Enjoy hot!!
 |
 |
 |
 |
 |
 |
 |
 |

|
VEGETABLE SPRING ROLLS, CARROT JUICE

This is also one of the thing I learnt from my SIL here in Singapore. This is the first snack I learnt to make of my own,that too a different cuisine,when I came newly to Singapore. I proudly make this when our relatives visit us…
Ingredients:
For stuffing:
| Cabbage&carrot,finely chopped | 2 cups |
| Pepper (black/white) | 1 tsp |
| Soya sauce | 1/2 tsp |
| Salt | As needed |
| Olive oil | 2 tsp |
And Spring roll pastry sheets,ready made.

And a teaspoon of maida/all purpose flour for sealing purpose.

Method:
- Heat a pan with olive oil and add the carrots first and fry for a minute.
- Then add the cabbage and fry for one more minute in high flame.
- Add the soy sauce,salt and pepper powder and fry in medium flame for one more minute. or until the cabbage is just done. Retain its crunchiness don’t over cook to make it soggy.
- That’s all,our stuffing is ready.
 |
 |
 |
 |
To make the spring roll:
- As per the instructions given in the cover of the pastry sheets,thaw the pastry sheets(keep out for 45 mins). Cover with a wet kitchen towel to avoid drying.
- Take one sheet carefully and keep as shown in the picture.
- Keep the stuffing a little above one corner.
- Take that corner and roll in such a way to cover the stuffing until half way.Make a paste of maida with little water and use that to line the corners of the pastry sheets as shown in the picture.
- Roll till half way as shown.
- Fold the corners both the sides towards the centre shown in the picture.
- Again roll tightly to make it completely sealed.
- Repeat the process to finish the stuffing. Keep covered until cooking,to avoid drying.
- We can either deep fry or shallow fry these spring rolls. I just used 2 tsps of olive oil to fry in a shallow pan.
- Taste wise no compromise,so you can try this way. Fry carefully in medium flame with constant turning over to ensure even cooking and avoid burning!
 |
 |
 |
 |
 |
 |
 |
 |
 |
 |
 |
 |
 |

CARROT JUICE
I am very bad in eating vegetables![]() . Applies to healthy juices too. When I saw this eye appealing and attractive title ‘Carrot juice – The natural Fanta
. Applies to healthy juices too. When I saw this eye appealing and attractive title ‘Carrot juice – The natural Fanta![]() ’ in Sharmis blog, I decided to give it a try for myself and my kid. Today I tried it and it tasted awesome. I made without lemon for my kid as he is allergic to citrus and made with lemon for me. It was so refreshing and I am so happy that I consumed carrot,a veggie I hate the most.
’ in Sharmis blog, I decided to give it a try for myself and my kid. Today I tried it and it tasted awesome. I made without lemon for my kid as he is allergic to citrus and made with lemon for me. It was so refreshing and I am so happy that I consumed carrot,a veggie I hate the most.

Recipe Source : Sharmis Passions.
| Carrots | 2 nos. |
| Ginger | a small piece |
| Lemon juice | from half of a lemon |
| Sugar or honey | 2 tsp |
| Salt | A pinch |
| Water | As needed |

Method:
- Chop the carrots after cleaning them and the ginger as well.
- Grind them in the juicer jar with enough water.
- Strain it using a double strainer or a tea strainer(cloth).Squeeze the lemon and add sugar,mix well.
- Enjoy as such or chilled.
 |
 |
 |

Popular entries
-
 The Tupperware Jel-Ring is an old classic and still today, it is very popular with my Tupperware customers. I must admit, its also one of my...
 -
 I had soya chunks/nuggets in my hostel canteen,when I was studying in Trichy. We get mixed vegetable kurma with soya chunks in it. My f...
 -
Only two days for the New Year to come,and at this point I am very happy to announce you that I am hosting an event for the ...
-
How is it going? For me, it has been quite a busy day chatting up with my family and friends. Nevertheless I spun a very tasty, to...
-
 Ahem. Please take note: I am throwing a healthy dinner into the mix of Super Bowl snacks and Valentine Day sweets. Have I mentioned I am st...
 -
 This is a great recipe by Tupperware that utilizes the Tupperware Oval Microwave Cooker. This recipe will make 6 servings. Rotisserie Chicke...
 -
 I wanted to try instant oats idly for a long time. I used to make a version of this before,by adding a oats as major part in the rav...
 -
 Evidently, according to Ceci Snyder of the National Pork Board , their slogan “the other white meat” is getting a little boring and “just...
 -
The spicy curry cooking on the stove and a cloudy weather outside is just what I need on a lazy day like today. With this kind of weathe...


