Showing posts with label Appetizer. Show all posts
The Bowls Are Coming!
in Appetizer on Wednesday, December 26, 2012
The first I posted a while back- a nice spicy eggplant dip. Delicious. You can find it HERE. But it takes a tad more time to prepare than you may wish to spend. The others are simple to make and can be made a day ahead- in fact I've found most dips are better the second day, haven't you?
Happy New Year everyone and Happy Bowl watching!
Sun Dried Tomato Dip
Adapted from Cuisine At Home

Ingredients:
8 ounces cream cheese, room temperature
6 ounces plain yogurt
1/4 cup sour cream
3/4 cup oil packed sun-dried tomatoes, drained
1/3 cup shallots, coarsely chopped
1 tablespoon fresh lemon juice
1/2 teaspoon lemon zest
1/2 teaspoon kosher salt
1/3 cup fresh parsley, finely chopped
1 tablespoon minced fresh tarragon
Method:
Blend cream cheese, yogurt, sour cream, tomatoes, shallots, lemon juice, zest and salt in a food processor until smooth. Fold in parsley and tarragon, then chill for at least 1 hour.
Smoked Bluefish Paté
From Open House Cookbook by Sarah Leah Chase

Ingredients:
1 pound smoked bluefish, skinned and flaked (I use whitefish)
12 ounces cream cheese, softened
6 tablespoons butter, softened
1 red onion, minced
1/4 cup chopped dill pickle
2 tablespoons capers, drained
3 tablespoons lemon juice
2 tablespoons cognac
Method:
Beat fish, cream cheese and butter in a bowl. Add other ingredients but do not over beat. Some texture is desired. Cover and refrigerate several hours. Serve with crackers. Makes about 3 cups.
Smoked Salmon Spread
From Barefoot Contessa, Family Style

Ingredients:
8 ounces cream cheese, at room temperature
1 teaspoon horseradish, drained
1/2 cup sour cream
1/2 teaspoon kosher salt
1 tablespoon freshly squeezed lemon juice
1/4 teaspoon freshly ground black pepper
1 tablespoon minced fresh dill
1/4 pound (4 ounces) good quality smoked salmon, minced
Method:
Cream the cheese until just smooth. Add the sour cream, lemon juice, dill, horseradish, salt, and pepper, and mix. Add the smoked salmon and mix well. Chill and serve with crackers or toasted baguette slices.
Shrimp Remoulade
in Appetizer on Tuesday, November 27, 2012
I don't make the remoulade as often as I used to which is strange because my boys especially love it. This year though, they are going to be surprised: we are going to a friend's home for Christmas Eve and the hostess is going to make it. Mother's recipe was included in a family cookbook I did a couple years ago and she has a copy.
Because I made the remoulade for a cocktail party last week, I took photos as I went along (The blogger's ongoing obsession with photos!) so I could eventually post it. It's always a big hit and while I suppose you could eat it right away, it really needs to sit in the fridge for 24 hours so the flavors can meld. We never serve it with crackers, just some pretty party picks placed nearby.
Mother's Shrimp Remoulade

Ingredients:
3 pounds cooked shrimp, shelled and deveined
1 1/4 cups salad oil
1/2 cup Dijon mustard
1/3 cup white wine vinegar
2 teaspoons salt
2 teaspoons paprika
2 teaspoons red hot pepper sauce
2 chopped hard boiled eggs, chopped fine
1 cup celery, small dice
1/4 cup parsley, minced
2 tablespoons scallions, sliced thin
1 tablespoon green pepper, small dice
Method:
Combine oil, vinegar, mustard, salt, paprika and hot pepper sauce in a bowl. Whisk briskly and then add remaining ingredients.

Add shrimp. Mix well.

Cover and refrigerate overnight. Stir often. We never served this with crackers, just had some pretty toothpicks alongside.
Lobster and Mango Cocktail
Black Friday has arrived...which always makes me sit up and take notice: the Christmas holidays are upon us. The Christmas trees have filled the lots on main street and the stores, bless them, have had their holiday decorations up since Halloween. It's that time, my friends....of good cheer, carol singing, happy children's faces and candy canes.
So, even before the turkey leftovers have disappeared, are you planning your next holiday meal? At least on paper? I am. I'm an inveterate list-maker. My Christmas list has been made for months and I'm nearly done. I like to finish early... no panic shopping for me.... so I can kick back and enjoy the sparkling tree lights, wrap gifts with care, cook with love, share egg nog with friends, help the less fortunate children among us with the Spirit of Giving Network, remembering what Christmas really means and taking time to enjoy the holiday.
I'm really looking forward to everyone's postings for the next few weeks...I just know you're all going to be chock full of great holiday ideas. I hope you can discover an idea or two here that will help with your planning as well.
Here's an elegant starter for a sit-down holiday dinner. I normally use lobster, but don't see any reason why you couldn't substitute shrimp or crab. I've never really cared for the Cognac addition (so unlike me!), but do a little taste test for yourself and decide. I debated about using rum instead. Next time, perhaps. It has all those lovely Caribbean flavors, doesn't it? Also, try to find a nice sweet mango. If it's unavailable where you live, you could try melon. Lots of possibilities with this appetizer.
Lobster and Mango Cocktail
From Gourmet Magazine, June 1992

Ingredients:
1/3 cup mayonnaise
1/3 cup plain yogurt
2 tablespoons Cognac (optional)
1 tablespoon ketchup
1 tablespoon fresh lemon juice, or to taste
four 1 1/2-pound live lobsters (I used lobster tails)
3 firm-ripe mangoes
1 cup finely diced celery
4 whole Belgian endives plus 12 leaves for garnish
3 tablespoons minced fresh chives plus 24 whole chives for garnish
Method:
In a small bowl whisk together the mayonnaise, the yogurt, the Cognac, the ketchup, the lemon juice, and salt and pepper to taste and chill sauce, covered. Plunge the lobsters into a large kettle of boiling salted water and boil them, covered, for 10 minutes. Transfer the lobsters with tongs to a bowl and let them cool until they can be handled. Crack the shells, remove the meat, and cut it into 3/4-inch pieces. Transfer the lobster meat to a large bowl and chill it, covered. The lobster cocktail may be prepared up to this point 1 day in advance.
Halve the mangoes by cutting just to the sides of each pit and, using a 3/4-inch melon-ball cutter, scoop the flesh from the mango halves. (There should be about 2 cups.) To the lobster meat add the mango balls, the celery, the whole endives, trimmed and sliced thin crosswise, the minced chives, and the sauce and toss mixture until it is combined. Divide the lobster mixture among 12 chilled small glasses and garnish each serving with 1 of the endive leaves and 2 of the whole chives.
Serves 12.
Game Day Bites
in Appetizer on Wednesday, September 26, 2012
Whatever sport you're watching on TV, one thing I bet we all have in common is a plate of something delicious to nibble on. Football is our game of choice in the fall and University of Michigan is MY team of choice. (M Go Blue!) Whether college or pro ball, I'm always on the lookout for new game day treats so I thought I'd post a few here and there this fall.
Quite a while back, I came across these spicy little mouthfuls on Big Girls Small Kitchen, a favorite blog of mine. Cara and Phoebe are old high school friends, each living in New York city, which they refer to as "a big city of small kitchens". They have some super recipes and are publishing a cookbook, called Cara and Phoebe's Quarter-Life Kitchen, due out in 2011.
Phoebe's family have been friends with Ina Garten (The Barefoot Contessa) for years and in 2006, in an oft-repeated episode called Good Home Cooking, Cara and Phoebe were guests on Ina’s show, returning from college to a huge platter of gravlox, fresh fruit, and a basket of sour cream blueberry muffins. In 2009, Phoebe actually got to cook a holiday meal with Ina on her show, which I unfortunately haven't seen.
This recipe is Phoebe's. Not only can it be used as a game day bite, it would be a super appetizer for a Mexican or Southwestern themed dinner. Delicious AND healthy. An unbeatable combination.
Black Bean Cakes with Mango-Lime Crema
From Big Girls Small Kitchen

2 15oz cans black beans
Method:
Making Fresh Bread Crumbs

More Puff Pastry
in Appetizer on Saturday, August 18, 2012
(Adapted from Giada De Laurentis)

1 (10 by 9 inch) sheet frozen puff pastry (thawed in your refrigerator overnight)
1/2 cup olive tapenade
1 cup shredded fontina cheese
8 cherry tomatoes
6 basil leaves, chopped
Preheat oven to 400°. Put rack in the center of the oven and line a baking sheet with parchment paper.
Put the puff pastry on a floured board. Prick all over with a fork. Using a 2 ¼ inch cookie cutter, cut out 16 (we only got 12 or 13) rounds of pastry. Place them on the baking sheet. Place another piece of parchment paper on top of the pastry rounds and top with another baking sheet so it will press down slightly on the rounds and keep them flat. (We didn't use a very heavy pan so I wonder if a heavier one would make them thinner? Or do we even want them thinner?) Bake for 10 to 12 minutes until golden.
Remove the baking pan and top sheet of parchment paper.

Spread 1 teaspoon of the tapenade on each round. (We purchased some tapenade in a jar at the market and it was excellent.) Place a tablespoon of cheese on top and then top with a cherry tomato, halved. If the tomatoes were small I used 2, but I think 1 half is plenty and easier to eat.
Bake for an additional 5-7 minutes (I think we should have baked ours a little longer- keep checking). Remove from the oven and sprinkle the basil on top.
Vacations and Giveaways!
Thanks everyone, for all your kind comments regarding my broken wrist. I am constantly amazed at the caring and support that pours forth from our blogging community for even the most minor problems (which this is). You are the best! :)
***********************************************************************
We're going on a short vacation to the Turks and Caicos. Providenciales to be exact.

Ahhhhhh. Will you look at that! Pink sand and vivid blue ocean.
Can there possibly be a down side? Well, yes, three. #1: it's hurricane season and August and September are when they tend to hit Florida and the northern Caribbean. And # 2? I'm going with a cast on my arm! Damn. Last but not least, I won't be visiting your blogs until I get back. I need a rest from everything. I know you'll understand.
But I'm going to leave you with two things:
A Summer Giveaway!!
From American Spoon in Northern Michigan, my old stomping grounds, I give you their summer gift package.
Please go to their website to check out this wonderful company. I was there when they started as just a little storefront in Petoskey. How they have grown!
This is a perfect way to celebrate the end of summer....with a gift assortment of the fabulous fruits of the Michigan summer to cheer you with warm memories through the long winter ahead!
Flavors include: Early Glow Strawberry Preserves, Red Haven Peach Preserves, Blueberry-Lime Preserves, Leelanau Apricot Preserves, Sour Cherry Preserves, Bartlett Pear Preserves, Neva Betta Whole Wheat Crackers and Neva Betta Original Crackers.

To win, just leave a comment and if you become a follower, you'll get two entries! (Please leave a separate comment for each.) U.S. only, please.
I'll announce the winner on August 25th.
And the last thing I'm leaving you with? A lovely little recipe that I've made for years and years. You can get the kids to help you make them on a rainy day. Make a bunch and freeze them. It just can't get any simpler than this. And do they ever taste great. Shades of the 60's!
Cheddar Olives

Ingredients:
1 cup grated sharp Cheddar
2 tablespoons unsalted butter, softened
1/2 cup all-purpose flour
1/8 to 1/4 teaspoon cayenne (your choice)
a jar of small pimiento-stuffed green olives, drained and patted dry (about 24)
Method:
Preheat the oven to 400 degrees F.
Drain the olives well, and dry them completely with paper towels. Set aside.Combine the other ingredients in a bowl and mix well until a dough forms. You can knead it with your hands, if necessary, until it has the consistency of play-dough.Pinch off a small amount of dough, flatten it, and wrap it around a dry olive. Being careful not to squeeze the olive, pinch off any excess, then roll it in your hands until smooth. Continue until all the olives are covered.

Bake for 15 minutes, or until golden brown. OR freeze, wrapped tightly, and they will last for months. Bake straight from the freezer for 20 minutes.
A Stilton and Wild Mushroom Galette
in Appetizer, Pies and Tarts on Thursday, July 19, 2012
I hope you like the strong and tangy flavor of stilton because it really shines in this galette. My family happens to love it and one of my guests was originally from Great Britain...he was in 7th heaven. (I made some of Ina Garten's stilton crackers for he and his wife last year and they loved those too. Must remember to post about them.)
Stilton has been made since the 1700s, and has earned a protected origin designation, which means that only Stilton meeting a set of exacting standards can be labeled and sold as Stilton. It is produced in two varieties: the well-known blue and the lesser-known white.

•There are just 6 dairies in the world licensed to make Blue Stilton cheese
•It takes 136 pints milk (78 litres) to make one 17 lb (8kg) Stilton cheese
•Over 1 million Stilton cheeses are made each year
And here's an odd fact I ran across: a 2005 study carried out by the British Cheese Board claimed that when it came to dream types, Stilton cheese seemed to cause odd dreams, with 75% of men and 85% of women experiencing bizarre and vivid dreams after eating a 20-gram serving of the cheese half an hour before going to sleep. That's less than 3/4 of an ounce, not much at all. On the other hand, most of us aren't eating this right before we go to bed either.
I used three kinds of mushrooms in my galette: my reconstituted morels, some shiitakes and some baby bellas. You'll find this galette is enough for 8-10 people as it goes a long way and it packs quite a punch. A small slice is enough for each person. Besides, the smaller the piece, the easier to hold so you don't have to supply plates!
Wild Mushroom and Stilton Galette
Adapted from Smitten Kitchen, October 19, 2006

Ingredients:
1 sheet of frozen puff pastry, thawed in the fridge overnight and rolled out to a 10 to 12" circle. Prick a fork all over the bottom, leaving a 1/2 inch around the edge.
For the filling:
1/4 ounce dried wild mushrooms, such as morels, porcini or shiitakes
1 cup boiling water
2 tablespoons unsalted butter
3/4 cup sliced green onions
1 garlic clove, minced
1/2 teaspoon chopped fresh rosemary
1/2 teaspoon chopped fresh thyme
1 lb. assorted fresh wild mushrooms, such as chanterelles, porcini and shiitakes, brushed
clean and large mushrooms thinly sliced (If these are unavailable, fill in with some button mushrooms)
5 ounces Stilton or other good-quality blue cheese
Method:
Make the filling: Place the dried mushrooms in a small bowl and add the boiling water. Let stand for 30 minutes until softened. Drain the mushrooms and mince finely.
Preheat an oven to 400°F.
In a large fry pan over medium heat, melt the butter. Add the green onions and saute, stirring occasionally, until soft, about 5 minutes. Add the garlic, rosemary and thyme and continue to cook, stirring, for 1 minute more. Increase the heat to high, add the fresh and rehydrated mushrooms, and saute until the mushrooms are tender and the liquid they released has completely evaporated, 8 to 10 minutes. Transfer to a plate and let cool.
On a floured work surface, roll out the puff pastry to a 10 to 12 inch round. Transfer to an parchment paper lined baking sheet.
Crumble the blue cheese into a bowl, add the cooled mushrooms and stir well. Spread the mixture over the dough, leaving a 1/2-inch border.
Bake until golden brown, 30 to 40 minutes. Remove from the oven, let stand for 5 minutes, then slide the galette onto a serving plate. Cut into wedges and serve hot, warm or at room temperature. Serves 8-10 as an appetizer or first course, depending on the size of the slices.

Tzatziki
in Appetizer, Condiments on Wednesday, June 20, 2012
Basically, the mixture combines yogurt and cucumbers with plenty of garlic and some chopped fresh herbs. English cucumbers (the kind that are shrink-wrapped at the grocery store) work best because they have few seeds, but you can use other cukes. Just be sure to slice them in half and seed them. Everyone has a different way to prepare the cucumber; I grate mine on a box grater and then twist them in a dish towel to get a little more juice out. I use Fage brand yogurt and place it in a sieve lined with gauze, over a glass bowl, covered, overnight. Please use Greek yogurt because regular yogurt will be too runny. I use both mint and dill in my Tzatziki and instead of lemon juice, I use champagne vinegar. But lemon juice is fine and what is used in most recipes.

My recipe comes from my dear friend Nancy, who passed away a number of years ago. I think of her every time I make it. She loved the Greek Islands, which is where she said she got the recipe. The only change I have made over the years was adding champagne vinegar. Nancy used lemon juice. But I saw Ina Garten make it with champagne vinegar once and I tried it. I liked it even better...it was tangier.
Nancy's Tzatziki

Ingredients:
1 17oz. container Greek yogurt (I used Fage)
1 English cucumber (I don't bother to seed this kind)
1/2 cup sour cream
2 tablespoons champagne vinegar
1 tablespoon olive oil
1 heaping tablespoon minced dill
1 heaping tablespoon minced mint
1 1/2 to 2 teaspoons minced garlic
2 teaspoons kosher salt
1/2 teaspoon freshly ground black pepper
Method:
Place the yogurt in a gauze or paper towel-lined sieve. Let stand, covered, overnight in the fridge. The next morning, grate the cucumber on a box grater. Dump it in a tea towel and twist to get some of the juice out. Add to the yogurt and then add the remaining ingredients.
Keep chilled until ready to serve. I serve it with pita chips.
Toasted Pita Chips
Preheat oven to 400°. Use 4 or 5 rounds of whole wheat pita, cut with scissors into triangles. Lightly brush both sides with olive oil and place on a foil-lined baking sheet. Sprinkle lightly with salt and pepper and bake in the oven until golden brown, about 8-10 minutes. Watch carefully as all ovens are different.
Savory Palmiers
in Appetizer on Saturday, May 19, 2012
(Adapted from Back to Basics, The Barefoot Contessa)

1 package frozen Pepperidge Farm puff pastry, defrosted
1/4 cup prepared pesto, store-bought or homemade
1/2 cup crumbled goat cheese, such as Montrachet
1/4 cup finely chopped sun-dried tomatoes in oil, drained
1/4 cup toasted pine nuts

Working from the short ends, fold each end halfway to the center. Then fold each side again toward the center until the folded edges almost touch. Fold one side over the other and press lightly.
 Place on a sheet pan lined with parchment paper. Repeat for the second sheet of puff pastry using the remaining ingredients. Cover both rolls with plastic wrap and chill for at least 45 minutes. Meanwhile, preheat the oven to 400 degrees. Cut the prepared rolls of puff pastry into 1/4-inch-thick slices and place them face up 2 inches apart on sheet pans lined with parchment paper.
  Bake for 14 minutes, until golden brown.
Patties
in Appetizer, Baked Snacks, Beef, Easy Peasy, Meat, Starters on Friday, April 27, 2012
It's tart and hot and will go into a wrap or sandwich bread and make a pretty good lunch.

Ingredients:
Ground Meat - 1/2 lb
Onions - 1 small finely chopped
Ginger garlic paste - 1/2 tbspn
Salt - 1/2 tspn
Lemon juice - a squeeze ( I am thinking about 1 tspn) Please be careful how much you add because the quantity of meat is very little. Also, if you are using ginger garlic paste its already salted and had a sour taste.
Mint Leaves - 3 sprigs (take out only the leaves and chop fine)
Green chilies - 3 finely chopped or 2 well ground
Shan kabab masala - 1 tspn
paparika - a dash
pepper - a dash

Method:
1. Mix all the ingredients together. (Use a glove if you do not like to work with fresh meat)
2. Make small patties, as thin as you can with the palm of your hand and place it on an oven proof tray
4. Bake at 400 D for 20 minutes. Turn the patties with a spatula after 10 minutes and brush the juices the meat express back on.
Enjoy it as is or sandwiched between bread or crumbled into a wrap with your favorite salad dressing.
Contributor: Sunitha
Michael Schwartz's Falafel Balls with Tahini Sauce
I've already introduced you to Michael in a previous post. This is the second recipe I've made from his new cookbook. (For more details about the cookbook and Michael's restaurant, go HERE.)
Today I'm all about falafel: the fish and chips of the Mediterranean, the tapas of the Middle East. If Israel has adopted a national food, falafel is it. But despite its strong connection with Israel, falafel actually originates from Egypt and was originally made from fava beans. Its roots can be traced right back to the Christian Copts of Egypt who were forbidden from eating meat during certain holidays and came up with a falafel-like alternative. Lebanese falafel often uses a combination of fava beans and chickpeas, while in Egypt, it is traditional to use just fava beans. I've only eaten falafel made with chickpeas. If you're interested in more history, I found a wonderful article about chickpeas HERE.
History aside, I've got to be absolutely the last blogger to make falafel. I've read about it, eaten it, but for some reason have never made it at home. I have several recipes saved but once I read Michael's cookbook, I decided on his rendition. And I had my share of problems (see Bench Notes) but I am nothing if not determined! And I was finally successful. They were fabulous. We loved the flavors and the crispness and when dipped in the tahini sauce they were a marvelous mouthful. Now that I have the hang of it, I'll make these again and again.
Falafel with Tahini Sauce
Adapted from Michaels' Genuine Food by Michael Schwartz

- I noticed Michael's recipe did not have any flour. Hmmmm. I'd rarely seen a falafel recipe without a little flour, bread crumbs or some sort of binder. I was doubtful, but I tried a small batch that way and they disintegrated immediately in the hot oil. I tried again, pressing very firmly on the falafel ball, as the recipe mentions the balls must be pressed tight or they will fall apart. No dice. Raised the temperature of the oil. That didn't work either. So, as to not waste my remaining ingredients, I cheated and added a little flour and had no further problems. Please note in recipe below I included the correct amount of flour I used. Sorry, Michael, but I'm going to use a little flour when I make them from now on.
- Also: use the dried garbanzos as called for. Not canned. Just not the same.
- And...make certain the temperature of the oil remains between 350 and 375. (Michael suggested 350; I increased it to 375.) I ended up cooking only 3 or 4 falafels at a time and the temperature stayed constant that way.
Ingredients:
Tahini Sauce
(makes 1 cup)
Ingredients:
1/2 cup tahini
1 tablespoon soy sauce
juice of 1 lemon
2 garlic cloves, minced
pinch of Kosher salt
Method:
Combine all the ingredients with 1/2 cup water in blender or processor. Process until smooth.
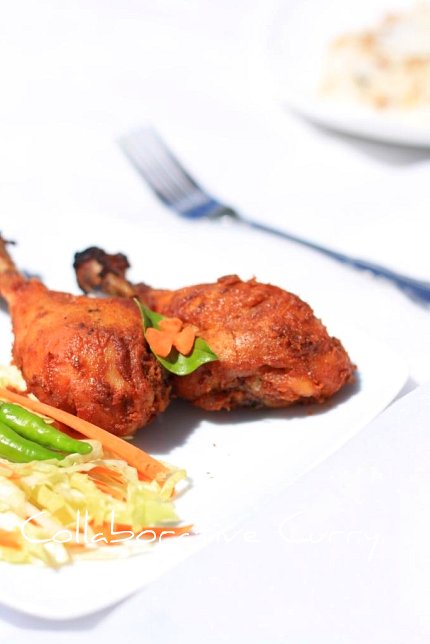
Tandoori Chicken
in Appetizer, Chicken, Finger Food, Nonvegetarian Side Dish, North Indian dishes, Poultry, Starters on Monday, March 19, 2012
Today's dish is so popular that it doesn't need any introduction.My family just love this and we make it quite often.Usually I do not add any food color,rather I would add more Kashmiri chilli powder for the color.See you all with another delicacy, soon :-)

Ingredients:
Chicken Drumsticks- 6-7
Yogurt- 4-5 Tbsp
Ginger-Garlic Paste- 1 Tbsp
Lemon Juice- 1 tsp
Pepper powder- 1/4 tsp
Red chilli powder- 1/2 Tbsp
Kashmiri chilli powder-1 Tbsp
Garam Masala- 1/2 tsp
Coriander powder- 1 Tbsp
Turmeric- a pinch
Red food color (optional)- a few drops
Salt- To taste
Oil- 1 Tbsp
Method:
1.Clean the drumsticks and remove all the water by placing them on paper towels.
2.Prepare the marinade by mixing together all the ingredients except the oil, listed.If you have time it would be great if you could take out all the water from yogurt by letting it hang in a muslin cloth for some time.
3.Make some incisions on the drumsticks and apply the marinade on each of them.
4.Finally sprinkle the oil on top and cover it, keep in the refrigerator for overnight or at least 8 hours.
5.Preheat the oven at 450 degree F.Place an Aluminum foil on a baking tray. (this would help reduce the mess).Place the drumsticks a few inches apart and spray with some oil.
6.Bake for about 30 minutes ,turning the sides in between.
7.If your oven has broil option keep it at 500 degree F, broil for 10 minutes,again turning the sides in between.If you are not broiling, keep it at 450 for another 10-12 minutes or until it is done.
8.If you have a grill, keep it on high until the chicken is done.This takes about 20-25 minutes.
Contributor: Namitha
Verrines

Verrines can be just about anything: appetizer, salad or dessert. For my trial run I chose an appetizer verrine. Now I don't have the adorable glasses that Kate and the book have, but used a small glass coffee cup. It seemed the perfect size for an appetizer as savory as this. I loved the way it turned out and served it the same night. Everyone was so enthusiastic! Here are a few other brilliant ideas from the book. The first two are both appetizers, the first one has a ratatouille base and the second is ham and cucumber. The second two are desserts, something fabulous in chocolate and the other is made with bananas and perhaps a panna cotta:


I'm going to make some these recipes for future posts, but after looking through the book it occurred to me that many of these verrines actually looked like deconstructed salads, appetizers and desserts. Why couldn't I give that idea a try? So I made a dessert I have been meaning to post: Eton Mess. And decontructed it in the brandy glass so when it's served, everyone can stir it all together and make the "mess" they're supposed to make!
Eton Mess originated at one of England's most famous public schools, Eton. As I understand, it is served during their prize-giving ceremonies. I think this translates perfectly into a dessert verrine.
Enjoy my two successful experiments, take another look at your glassware, think about what recipes would be fun showcased in each and go for it! Let me know any super inventions you come up with!
Verrine À l'italienne
Adapted from Verrines by José Maréchal

Ingredients:
60 grams (2 ounces) of black olive tapenade
50 grams (1.6 ounces) pesto
4 tomatoes
60 grams (2 ounces) sun dried tomatoes
large ball of Buffalo mozzarella
Method:
Cut the tomatoes into quarters, remove seeds and dice. Mix the tomatoes with the sun dried tomatoes in a food processor and process.
Cut thin slices of mozzarella with a cookie cutter that is exactly the size of your container.
To finish your verrine, layer tapenade, a slice of mozzarella, the tomato mixture, another slice of mozzarella and top it off with pesto. Serve with breadsticks.
Eton Mess Verrine
Adapted from Jamie Oliver’s Cook with Jamie

Ingredients:
1 basic meringue recipe (or buy some ready-made)
1 pint whipping cream
1 vanilla pod, scored and seeds removed
2 tablespoons sugar
2 cups strawberries, hulled and sliced
1/2 cup raspberries
1 teaspoon balsamic vinegar
1 teaspoon rosewater
Method:
Have your meringues prepared in advance. Whip the cream with the vanilla seeds. Soft peaks are good enough, you don’t need it to get too stiff. Take half the fruit, mash it in a bowl with sugar, balsamic vinegar and rosewater. The other half I sliced and added a touch of sugar. Smash the meringues into smallish chunks. Bring out your glasses and layer as follows: some of the crushed fruit, some crushed meringue, some whipped cream and then some of the sliced berries. Continue until your verrine is filled and top with a nice strawberry.
Mini Flautas
in Appetizer on Friday, February 3, 2012
Quesadillas are a perennial favorite with everyone, but they can be really messy to eat. And if everyone's either sitting around watching the game, or standing at a cocktail party, spills will happen. Phoebe and Cara at Big Girls, Small Kitchen have a solution: Mini Corn and Leek Flautas.
Flautas, which means "flutes", usually refers to a flour tortilla that is rolled up around a filling and deep fried. As opposed to Taquitos which are a corn tortilla rolled in a similar fashion with a filling of beef, chicken or cheese and fried until crisp. Flautas are sometimes rolled to be narrower on one end, resulting in a long, narrow cone shape, like a flute. But the main difference is that usually Flautas are flour torillas, and Taquitos are made of corn tortillas.
Phoebe and Cara came up with a mini flautas version, so easy to eat, and a super combo of ingredients. (You could certainly use your own imagination for fillings.) Also, they didn't want to deep fry, so they baked them in a hot oven. I'd say it was a huge success. Mine weren't as picture-pretty as theirs (I tried to cram too much filling in), but they were yummy, crunchy and dipped in a lovely cilantro lime crema, everyone loved them.
Mini Corn and Leek Flautas
From Phoebe and Cara at Big Girls, Small Kitchen


Ingredients:
Method:
From Martha Stewart, Everyday Food, March 2009
Ingredients:

Roasted Eggplant Spread
in Appetizer on Sunday, January 29, 2012
This is definitely a portable food event. A buffet is the only option; nobody wants to be sitting down at a table to eat when they'd rather be screaming at a television set or two. I wanted to catch you before you hit the grocery store and give you a new recipe to try - not one of the heartier snacks like Buffalo wings, pizza or chili - but a dip. Not only is this a really good dip, but (dare I say it?) a healthy one, too. Don’t get me wrong, I like the old standbys: clam dip, spinach dip, crab dip and 7 layer dip. And while I know eating smart and healthy just isn’t in the cards for Super Bowl parties, it might be fun to offer a refreshing new dip that is not only flavorful but healthy too.

Roasted Eggplant Spread
Ingredients:
2 medium eggplants, peeled
1 red bell pepper, seeded
1 red onion, peeled
2 garlic cloves, minced
3 tablespoons olive oil
1/2 teaspoon cayenne pepper
1 1/2 teaspoons kosher salt
1/2 teaspoon freshly ground black pepper
2 tablespoons freshly squeezed lemon juice
2 tablespoons tahini
3 tablespoons chopped parsley (save a few sprigs for garnish)
Method:
Preheat oven to 400°.
Cut the eggplant, red bell pepper and onion into 1 inch cubes. Mix the garlic, olive oil, cayenne, salt and pepper and toss with the vegetables. Spread on a non-stick or silpat-lined large baking sheet and roast for 45 minutes. Toss several times while roasting so the vegetables are evenly browned and tender. Cool slightly.

Pour all the vegetables into a food processor, add the lemon juice and tahini and pulse until blended. Add the chopped parsley and blend briefly. Put the eggplant mixture into a pretty bowl, garnish with a sprig of parsley and serve with toasted pita triangles.

Popular entries
-
 The Tupperware Jel-Ring is an old classic and still today, it is very popular with my Tupperware customers. I must admit, its also one of my...
 -
 I had soya chunks/nuggets in my hostel canteen,when I was studying in Trichy. We get mixed vegetable kurma with soya chunks in it. My f...
 -
Only two days for the New Year to come,and at this point I am very happy to announce you that I am hosting an event for the ...
-
How is it going? For me, it has been quite a busy day chatting up with my family and friends. Nevertheless I spun a very tasty, to...
-
 Ahem. Please take note: I am throwing a healthy dinner into the mix of Super Bowl snacks and Valentine Day sweets. Have I mentioned I am st...
 -
 Evidently, according to Ceci Snyder of the National Pork Board , their slogan “the other white meat” is getting a little boring and “just...
 -
 This is a great recipe by Tupperware that utilizes the Tupperware Oval Microwave Cooker. This recipe will make 6 servings. Rotisserie Chicke...
 -
 I wanted to try instant oats idly for a long time. I used to make a version of this before,by adding a oats as major part in the rav...
 -
The spicy curry cooking on the stove and a cloudy weather outside is just what I need on a lazy day like today. With this kind of weathe...


 Posts
Posts

